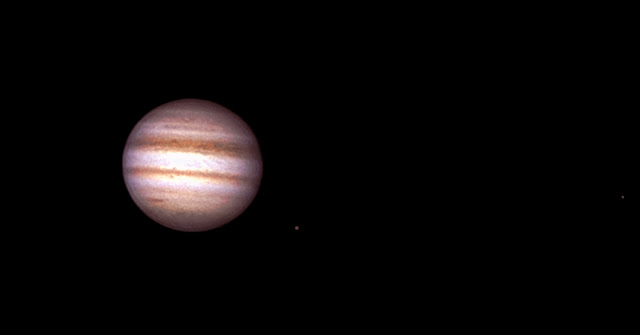
In this post I'm having a proper crack at Jupiter in Registax and Gimp, and documenting the process. The post is for process steps only - play with any and all parameters until you get the image you like! Below are all images of Jupiter produced from the same .avi capture. Which is your favourite?
I)
II)
III)
-------------------------------------------------------------------------------------------------------------
Processing steps
1) I took ~1800 (3 minutes) frames of Jupiter on Sunday 19th February 2012. The capture parameters are shown below. I used my Celestron 6SE with a Tele Vue 2.5x and my Orion Starshoot IV webcam. The video was captured with SharpCap.
[D-PEN]
Frame Divisor=1
Resolution=1280x1024
Frame Rate (fps)=10.00
Colour Space / Compression=RGB24
The gain was set very low - just enough to show a little detail. The image below is a single frame and demonstrates how the image appeared on my laptop. Still playing with the contrast/brightness etc, but set parameters that make the image look reasonable.
2) Open the video in Registax 6.
3) Align the image and hit limit.
4) Stack, set the wavelets and align RGB. Also play with the brightness and contrast..
5) Might also help to play with the histogram..
6) Autobalance for giggles?
7) Final Registax image - save as a .png somewhere
8) Open Gimp and load the image. Adjust the levels
9) Adjust brightness and contrast
10) Despeckle the image (in filters)
11) Unsharpen mask (in fliters)
12) Adjust the colour balance
13) Adjust hue and saturation
Welcome traveller
This blog is very much written for my benefit. I've previously tried writing a blog, but I got bored as I had nothing particularly interesting to say. In this blog I will be mostly documenting my progress when it comes to astrophotography. There are many resources on the web for astrophotography, but crucial and useful details are often overlooked. This is a my astro-journal.
Showing posts with label Orion StarShoot Solar system Color Imager IV. Show all posts
Showing posts with label Orion StarShoot Solar system Color Imager IV. Show all posts
21 February 2012
15 February 2012
My equipment
Before we get down to serious astro-business, it's probably best I say something about the equipment I’m using. Note however, this blog is going to be very pragmatic, so in this post there is no discussion or explanations. I will explain how and why I do things when the time comes. I want this blog to be useful, and not a theoretical exercise.
My telescope is a Celestron 6SE. A bunch of specs can be found here, but the key stuff is that it’s a 6” (150 mm) Schmidt-Cassegrain with a focal length of 1500mm.
 |
| Celestron 6 SE |
The aperture makes it very good for moon and planetary viewing, and the computerised Alt-Az mount is excellent for an intermediate viewing scope.
The scope is not ideal for deep-sky astrophotography due to the mount setup. In particular, as the mount is not equatorial the star-field in deep-sky observations will rotate – making long exposure images near impossible, and that’s not to mention the quality of extended tracking! Note, however, the tracking is fine for visual observation. I might have a bash at combating these hurdles in the future with a Wedge, but for the time being any deep-sky stuff will be done by stacking short exposure images, which avoid the tracking and field rotation problem. The mount is not the only problem for deep-sky imaging – the scope is very slow for deep-sky i.e. much long exposures are needed. I’ve alleviated this a little by attaching a Celestron focal reducer corrector f/6.3 – makes the scope ‘faster’ and the exposures required much shorter by ~3. We’ll explore this in due time.
One day I might buy a complementary scope for deep sky astrophotography, but for the time being I’ll make the Celestron work. This is one of the issues with astrophotography – there is no one-size fits all solution. It depends what you want to do, and my telescope does planets, solar and Moon stuff very well. Note however, NEVER EVER look at the sun through a telescope unless you have the appropriate equipment – not only would it break the optics, but it WILL blind you instantly.
In terms of other bits, I have:
9mm Meade Possl
25mm Celestron Plossl
Tele Vue Powermates 2.5x and 5x (1,25”)
For the taking of photos, I use:
Orion StarShoot Solar System Color Imager IV webcam (Good for Moon and planets)
 |
| Orion StarShoot Solar System Color Imager IV |
Canon EOS 550D DSLR (deep-sky / other stuff)
 |
| Canon EOS 550D |
AND, don’t forget a Power Tank to power the telescope. Batteries run down fast and ruin tracking! Needless to say, a computer is needed to capture images from the webcam and process a night's observations, but I will get to software shortly.
Watch this space – my equipment list might get an update at some point ;)
Subscribe to:
Posts (Atom)


